Reading S3 data into a Spark DataFrame using Sagemaker
I recently finished Jose Portilla’s excellent Udemy course on PySpark, and of course I wanted to try out some things I learned in the course. I have been transitioning over to AWS Sagemaker for a lot of my work, but I haven’t tried using it with PySpark yet. Unfortunately, setting up my Sagemaker notebook instance to read data from S3 using Spark turned out to be one of those issues in AWS, where it took 5 hours of wading through the AWS documentation, the PySpark documentation and (of course) StackOverflow before I was able to make it work. Given how painful this was to solve and how confusing the documentation on this generally is, I figured I would write a blog post to hopefully help anyone who gets similarly stuck.
Setting up S3 and AWS correctly
The first thing that you need to ensure is that Sagemaker has permission to access S3 and read the data in the first place. The easiest way I’ve found to do this (as an AWS beginner) is to set up IAM role for all of your Sagemaker notebooks, which allows them (among other things) to read data from S3 buckets. This guide walks you through all of the steps to do this.
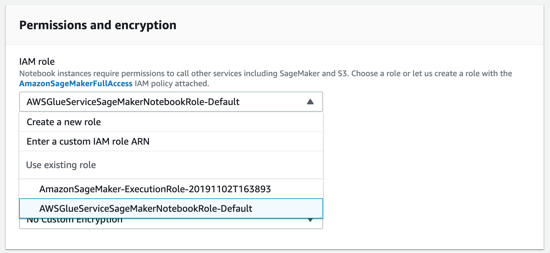
Next, you need to go back over to Sagemaker and create your notebook instance. While you’re creating it, you’ll see an option under “Permissions and encryption” to set the IAM role. You should select the role you just created in the step above. As you can see, I called my role AWSGlueServiceSageMakerNotebookRole-Default, as recommended in the tutorial. You can leave all of the other options as their defaults and create your notebook instance.

You now need somewhere to store all of your data. Go over to S3 and create a new bucket. AWS recommends that you prefix the name of your bucket with Sagemaker, but I don’t think this is necessary for Sagemaker to be able to recognise the bucket. You can now upload your data into the bucket.
Next, you will need to retrieve your AWSAccessKeyId and AWSSecretKey, which will be needed for PySpark to read in the data. This guide steps you through how to generate and retrieve these.
Finally, go back to your notebook instance in Sagemaker and open up JupyterLab. Scroll down to the bottom of the Launcher screen to the “Other” applications, and open up Terminal. As per this guide, we need to check our config file is set to the right AWS region and also put our AWSAccessKeyId and AWSSecretKey in the credentials file. To get started, navigate to ~/.aws and check the contents:
!cd ~/.aws
!ls
config credentials
Open the config file, and check that the region matches the one you’ve set your Sagemaker notebook up in. For example, my notebook is in the Frankfurt region, so my config file looks like this:
!head ~/.aws/config
[default]
region = eu-central-1
Next, if you don’t have a credentials file, you’ll need to create one. Inside, you need to paste your AWSAccessKeyId and AWSSecretKey in the following format:
[default]
aws_access_key_id = YOUR_KEY
aws_secret_access_key = YOUR_KEY
Configuring sagemaker_pyspark
We’ve finished all of the preparatory steps, and you can now create a new python_conda3 notebook. Once we have this notebook, we need to configure our SparkSession correctly.
When I initially started trying to read my file into a Spark DataFrame, I kept getting the following error:
Py4JJavaError: An error occurred while calling o65.csv. : java.lang.RuntimeException: java.lang.ClassNotFoundException: Class org.apache.hadoop.fs.s3a.S3AFileSystem not found
I was missing a step where I needed to load the Sagemaker JAR files in order for Spark to work properly. You can see this in the code below, where I used SparkConf to do this.
Finally, we need to also make the AWSAccessKeyId and AWSSecretKey visible to the SparkSession. We can use a package called botocore to access the credentials from the ~/.aws/credentials file we created earlier. You can see that instead of us needing to pass the credentials directly, the botocore session pulls them out of our credentials file and stores them for us. We’ve also passed the SparkConf that we created as a config in the SparkSession builder as well.
from pyspark import SparkConf
from pyspark.sql import SparkSession
import sagemaker_pyspark
import botocore.session

session = botocore.session.get_session()
credentials = session.get_credentials()

conf = (SparkConf()
        .set("spark.driver.extraClassPath", ":".join(sagemaker_pyspark.classpath_jars())))

spark = (
    SparkSession
    .builder
    .config(conf=conf) \
    .config('fs.s3a.access.key', credentials.access_key)
    .config('fs.s3a.secret.key', credentials.secret_key)
    .appName("schema_test")
    .getOrCreate()
)
Alternatively, if you’re having problems with botocore reading in your credentials, you can also paste in your AWSAccessKeyId and AWSSecretKey directly as strings. This is obviously a bit less secure, so make sure you delete them from your notebook before sharing it with anyone!
spark = SparkSession.builder \
        .appName("schema_test") \
        .config(conf=conf) \
        .config('fs.s3a.access.key', YOUR_KEY)\
        .config('fs.s3a.secret.key', YOUR_KEY)\
        .getOrCreate()
And that’s it, we’re done! We can finally load in our data from S3 into a Spark DataFrame, as below.
bucket = "sagemaker-pyspark"
data_key = "train_sample.csv"
data_location = f"s3a://{bucket}/{data_key}"

df = spark.read.csv(data_location, header = 'True', inferSchema = True)

df.limit(5).toPandas()
| TRIP_ID | CALL_TYPE | ORIGIN_CALL | ORIGIN_STAND | TAXI_ID | TIMESTAMP |
|---|---|---|---|---|---|
| 0 | 1372636858620000589 | C | None | NaN | 20000589 |
| 1 | 1372637303620000596 | B | None | 7.0 | 20000596 |
| 2 | 1372636951620000320 | C | None | NaN | 20000320 |
| 3 | 1372636854620000520 | C | None | NaN | 20000520 |
| 4 | 1372637091620000337 | C | None | NaN | 20000337 |
I hope this guide was useful and helps you troubleshoot any of the problems you might be having getting PySpark to work with Sagemaker, and getting it to read in your data from S3.
